A compact track loader may look ready after a quick glance, but small defects can create serious risks. A cracked hose, loose bolt, or damaged track can change machine behavior within minutes. Daily safety checks help operators find these problems before starting work. They also create a practical record of care, especially on busy construction sites, farms, and landscaping projects.
What are the daily safety checks for a compact track loader? The answer begins with the operator’s manual and a careful walk-around. Check the tracks, rollers, sprockets, attachment points, hydraulic lines, fluid levels, and visible leaks. Look beneath the machine for fresh oil or coolant. Inspect the bucket or other attachment for cracks and bent edges. Confirm that the seat belt, safety bar, mirrors, lights, horn, backup alarm, and emergency controls work correctly. Keep the cab floor clear. Remove mud from steps and access areas.
Do not rely on experience alone. Even skilled operators can miss a worn fitting during a rushed inspection. That is worth remembering. Start the loader only from the operator’s seat, with people clear of the attachment and travel path. Test steering, braking, and auxiliary controls at low speed in a safe area. Stop immediately if a warning light appears, a control feels unusual, or the machine makes a new sound. Never treat a checklist as paperwork only. It should support sound judgment, manufacturer guidance, and qualified maintenance. A careful five-minute inspection can prevent downtime, equipment damage, and avoidable injuries. Some checks may feel repetitive. They still matter every day.
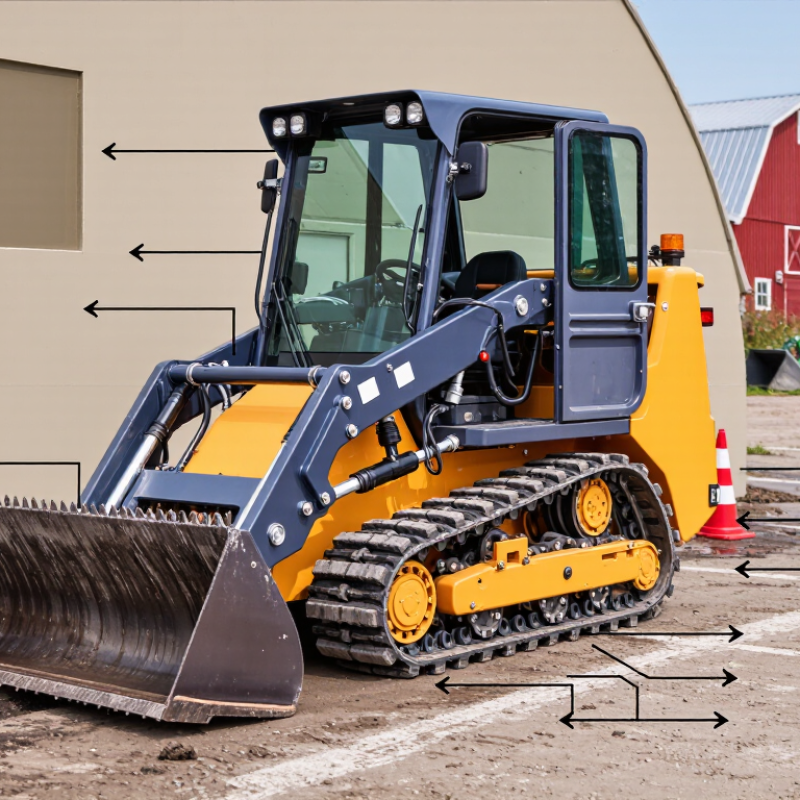
Before checking a compact track loader, prepare a controlled inspection area. Park on firm, level ground away from traffic, slopes, and overhead hazards. Engage the parking brake and lower the attachment fully. Shut down the engine, remove the key, and allow hot components to cool. Never inspect beneath a raised attachment without approved support.
Wear safety footwear, gloves, eye protection, and close-fitting clothing. Keep a flashlight, clean rag, tire-pressure gauge, and the operator’s manual nearby. Good lighting matters, especially around the engine bay and undercarriage. Clear mud, stones, and loose tools from the ground. A clean area makes small leaks easier to see.
I walk around the machine before starting it. Look for damaged hoses, loose bolts, cracked welds, and fresh oil or coolant. Check the tracks for cuts, missing parts, abnormal wear, or packed debris. Inspect the attachment pins, cutting edges, and hydraulic couplers carefully. Confirm that guards, steps, mirrors, and warning labels are secure. It is easy to overlook the rear area.
I once treated a small hydraulic stain as harmless. That assumption deserved more attention. Wipe the area clean and recheck it after operation. Record unusual findings instead of relying on memory. Do not operate the loader if a safety control, hydraulic line, or structural part appears defective. Ask a qualified technician to assess uncertain damage before work begins.
Before starting work, keep the inspection area level, well lit, and clear of people and obstacles. Follow a consistent walk-around sequence covering the work area, personal protective equipment, fluid leaks, tracks, attachments, controls, and safety devices. Do not operate the loader until defects affecting safe operation have been corrected.
A daily safety check on a compact track loader should begin before the engine starts. Park on level ground, lower the attachment, engage the parking brake, and remove the key. Walk around the machine with a flashlight. Look for damaged guards, loose hardware, leaking fluid, or track debris. Check the seat belt, restraint bar, mirrors, and handholds. The seat belt should latch firmly and release without sticking. Small defects matter.
Sit in the operator’s seat and test each control gently. Move the joysticks and pedals through their full range only after confirming the area is clear. Controls should return smoothly to neutral. Test the parking brake and verify that travel functions remain disabled when the restraint system is raised. Never rely on memory alone. A simple checklist prevents skipped steps, especially during a busy morning.
Warning systems need equal attention. Turn the key to the inspection position and confirm that indicator lights appear briefly. Test the horn, backup alarm, work lights, and audible alerts. Any warning that stays active, fails to sound, or flickers requires investigation before operation. Check the display for unusual messages and record the machine hours and defects. It is easy to dismiss a weak alarm as “probably fine,” but that judgment can be wrong. No inspection is perfect. Pause, recheck, and report unclear conditions to a qualified supervisor.
A compact track loader deserves a daily fluid and component inspection before its tracks move. The U.S. Bureau of Labor Statistics recorded 1,075 fatal construction work injuries in 2023. A careful walkaround cannot prevent every incident, but it can expose small failures early.
Park on level ground, lower the attachment, shut down the engine, and relieve hydraulic pressure. Check engine oil, coolant, fuel, and hydraulic fluid at the correct levels. Look beneath the machine for fresh drips. Do not open a hot radiator cap. Even a small leak matters. Fluid loss can quickly become overheating, seizure, or hydraulic failure.
Inspect belts, hoses, wiring, battery connections, filters, and the engine compartment. Look for cracked insulation, loose clamps, worn belts, and packed debris near hot surfaces. Examine every hydraulic line for abrasion, bulges, cuts, or wet fittings. Never search for a pinhole leak with your hand. OSHA recommends controlling hazardous energy and preventing exposure during equipment maintenance. Use cardboard or a suitable inspection tool instead. NIOSH FACE investigations have repeatedly documented severe injection injuries from pressurized hydraulic systems. I once overlooked a damp fitting during a rushed check. That mistake changed my routine. Now I wipe the area clean, restart only when safe, and recheck it for fresh fluid. A written defect log helps, although it is easy to skip when production pressure rises. Stop operation when a critical leak, damaged hose, or unsafe engine condition appears.
| Inspection Area | Component or Checkpoint | How to Inspect | Acceptable Condition | Corrective Action |
|---|---|---|---|---|
| Fluids | Engine oil level | Park on level ground, shut down the engine, allow oil to settle, and check the dipstick according to the operator’s manual. | Oil is within the marked operating range; no milky appearance, metal particles, or strong fuel odor. | Do not overfill. Add the specified oil if low, investigate contamination, and report leaks or abnormal oil condition. |
| Engine coolant | Check the expansion reservoir only when the engine is cool. Inspect the radiator area for damage or debris. | Coolant is between the low and full marks; hoses and radiator surfaces are dry, intact, and unobstructed. | Never remove a hot radiator cap. Allow the machine to cool, clean debris safely, and repair leaks before operation. | |
| Hydraulic fluid level | With the attachment lowered and the machine positioned as specified by the manual, check the sight gauge or reservoir level. | Fluid is within the designated range and appears clean, without excessive foam or visible water contamination. | Use only the specified hydraulic fluid. Find and repair the source of any leak before topping up repeatedly. | |
| Fuel system | Inspect the fuel tank, cap, hoses, fittings, and the area beneath the machine for signs of leakage. | No fuel odor, wet spots, cracked hoses, loose fittings, or damaged cap seal. | Stop operation for an active fuel leak. Clean spills promptly and keep fuel away from hot surfaces and ignition sources. | |
| Leak and puddle check | Look beneath the loader and around engine, cooling, fuel, and hydraulic components before starting. | No fresh oil, coolant, fuel, or hydraulic fluid on the ground or component surfaces. | Tag the machine out when a leak could affect safety or fluid level. Do not use hands to search for pressurized leaks. | |
| Engine Components | Air intake and filter housing | Check the intake hose, clamps, pre-cleaner if fitted, and filter housing for damage, loose connections, or heavy dust buildup. | Hoses are secure and intact; housing is closed correctly; intake openings are clear. | Clean or replace the filter as specified. Do not operate with an unsealed or damaged intake system. |
| Belts and pulleys | With the engine off, inspect visible belts for fraying, cracks, glazing, oil contamination, and abnormal slack. | Belts are correctly routed, free from damage, and tensioned according to the service specification. | Keep hands and clothing away from moving parts. Replace damaged belts and correct alignment or tension problems. | |
| Battery and electrical wiring | Inspect terminals, cables, battery hold-downs, connectors, and exposed wiring for corrosion, looseness, or damage. | Battery is secure; terminals are tight and clean; cables are insulated and routed away from heat and abrasion. | Isolate power before electrical repairs. Replace damaged cables and remove corrosion using approved procedures. | |
| Exhaust system | Check the muffler, exhaust pipe, shielding, and mounting points for cracks, looseness, or soot marks. | Exhaust components are securely mounted, free from cracks, and routed away from combustible materials. | Do not operate with an exhaust leak or missing heat shield. Allow components to cool before inspection or service. | |
| Cooling system and debris screen | Inspect the radiator, oil cooler, charge-air cooler if fitted, and screens for grass, dust, or packed material. | Air passages are open and fins are not severely bent or blocked. | Shut down and cool the engine before cleaning. Use approved low-pressure cleaning methods to avoid fin damage. | |
| Hydraulic System | Hydraulic hoses | Visually inspect hoses along their full accessible length for cuts, abrasion, bulges, kinks, exposed reinforcement, or wetness. | Hoses are dry, properly routed, supported, and free from visible damage or contact with sharp edges. | Replace damaged hoses; never repair a high-pressure hose with tape or improvised clamps. |
| Hydraulic fittings and couplers | Check fittings, adapters, quick couplers, and caps for looseness, cracks, contamination, or leakage. | Connections are secure, clean, capped when disconnected, and free of seepage. | Relieve hydraulic pressure before servicing. Tighten or replace parts only according to the service procedure. | |
| Cylinders and rod surfaces | Inspect lift and attachment cylinders for bent rods, pitting, damaged seals, and oil collecting around the gland. | Cylinder rods are straight and smooth; seals are not producing active leaks. | Keep clear of raised equipment. Repair leaking or damaged cylinders before relying on the attachment for support. | |
| Auxiliary hydraulic circuit | Inspect auxiliary lines and attachment connections, then test controls at low engine speed in a clear area. | Controls respond smoothly without unusual noise, vibration, drift, or visible leakage. | Stop the test if the attachment moves unexpectedly or pressure-related noise occurs. Have faults diagnosed by a qualified technician. | |
| Pressure-leak safety | Use cardboard or a suitable inspection aid to locate suspected leaks; never use bare hands. | No high-pressure spray, mist, or fluid injection hazard is present. | Shut down, relieve pressure, and obtain medical attention immediately for suspected fluid injection injuries. | |
| Final Functional Check | Operator station and safety controls | Check the seat, restraint, switches, interlocks, warning indicators, mirrors, and visibility from the operator’s position. | Controls are identifiable and functional; restraint latches; warning systems operate as intended. | Do not bypass interlocks or operate with a failed safety control. Report and repair defects. |
| Tracks, rollers, and undercarriage | Inspect track condition, tension indicators if fitted, rollers, sprockets, idlers, and accumulated debris. | Tracks are intact and reasonably tensioned; no severe cuts, missing hardware, or obstructing debris is present. | Remove debris with the machine secured. Follow the service manual for track-tension adjustment. | |
| Attachment and quick-attach system | Inspect pins, locking mechanisms, hoses, cutting edges, teeth, and structural welds before connecting or using an attachment. | Attachment is correctly seated and locked; retaining parts are installed; no critical cracks or loose components are visible. | Lower the attachment, stop the engine, and correct any locking or structural defect before work begins. | |
| Documentation and release | Record inspection results, fluid additions, defects, and corrective actions on the daily checklist. | Every checkpoint is marked complete, and unresolved defects are clearly identified. | Release the loader for work only when safety-critical defects are corrected or formally controlled. |
A daily safety check starts before the loader moves. Park on firm, level ground, lower the attachment, stop the engine, and remove the key. Walk around the machine slowly. Inspect both tracks for missing lugs, exposed cords, cuts, and packed stones. Check track tension against the operator’s manual, not by guesswork. Look for fresh oil or grease near rollers, sprockets, and final drives. A track can appear tight while hiding internal damage. Use a flashlight in low light.
Examine the attachment closely. Confirm that pins, retainers, couplers, and mounting plates sit fully in place. Check bucket edges, forks, teeth, and welds for cracks or distortion. Hydraulic hoses need special attention. Bulges, abrasion, and damp fittings deserve correction before operation. Never place a hand under a suspended attachment. Use cardboard to locate suspected leaks. Small details matter.
If the loader uses tires, check pressure, tread, sidewalls, and valve stems. Compare pressure with the equipment manual and inspect each wheel for loose or damaged hardware. Then study the frame, lift arms, protective structures, steps, and access rails. Look for bent metal, cracked welds, missing bolts, and fresh rust around joints. I have seen operators overlook a loose step because the machine looked clean. That mistake is easy to repeat. Record defects with a photo and note their location. Do not operate until a qualified technician assesses safety-critical damage. Recheck everything after installing an attachment; couplers can seem locked when they are not.
Record defects and confirm safe operation before using a compact track loader. A daily check should begin with the hour meter, inspection date, operator name, and work location. Walk around the machine slowly. Look for damaged tracks, loose bolts, cracked welds, leaking hydraulic lines, and missing guards. Check fluid levels only when the machine is safely parked and cooled.
Write every defect in a clear inspection log. Include its exact location, severity, and a photograph when practical. Mark critical defects, such as failed brakes, damaged attachment couplers, steering problems, or hydraulic leaks, as “do not operate.” OSHA 29 CFR 1926.20(b)(2) requires frequent and regular inspections of machinery and equipment. A vague note like “machine bad” is not useful. I have seen rushed records hide the real problem.
Before work begins, test the seat belt, operating controls, parking brake, warning devices, lights, and backup alarm from a controlled position. Confirm that the attachment is locked and the work area is clear. Keep bystanders outside the exclusion zone. The U.S. Bureau of Labor Statistics recorded 5,283 fatal work injuries in 2023, showing why small warning signs deserve attention. NIOSH continues to identify struck-by and caught-in hazards as serious equipment risks.
Stop there. Report the defect, isolate the loader, and request qualified maintenance support. Recheck the repair before release. Mistakes happen, especially during busy shifts. The record must still be honest.
Park on firm, level ground away from traffic, slopes, and overhead hazards. Lower the attachment fully. Engage the parking brake, stop the engine, and remove the key. Allow hot parts to cool before inspection.
Wear safety footwear, gloves, eye protection, and close-fitting clothing. Keep a flashlight, clean rag, tire-pressure gauge, and operator’s manual nearby. Good lighting helps reveal leaks and damage.
Look for damaged hoses, loose bolts, cracked welds, and fresh oil or coolant. Inspect guards, steps, mirrors, warning labels, and handholds. The rear area is easy to overlook.
Check both tracks for cuts, missing lugs, exposed cords, and packed stones. Inspect rollers, sprockets, and final drives for fresh oil or grease. Check track tension against the operator’s manual. Do not rely on appearance alone.
Inspect pins, retainers, couplers, mounting plates, edges, teeth, forks, and welds. Look for cracks, distortion, loose hardware, and incomplete locking. Recheck the couplers after installing an attachment. They can seem locked.
Look for bulges, abrasion, damp fittings, and fresh fluid around hoses. Never place your hand under a raised attachment. Use cardboard to locate suspected leaks. Clean the area, then inspect it again after operation.
Check the seat belt, restraint bar, parking brake, mirrors, and handholds. Controls should move smoothly and return to neutral. Test the horn, backup alarm, work lights, indicator lights, and audible alerts. A weak alarm is not automatically acceptable.
Record the defect with a photo, location, and machine hours. Do not operate with defective safety controls, hydraulic lines, or structural parts. Ask a qualified technician to assess uncertain damage. I once dismissed a small stain. That judgment needed more care.
Daily safety checks help ensure a compact track loader is ready to operate safely and efficiently. What are the daily safety checks for a compact track loader? Begin by parking on level ground, stopping the machine, and clearing the inspection area. Check the operator’s seat belt, controls, lights, horn, backup alarm, mirrors, and other warning systems. Look for visible damage, loose parts, leaks, or anything that could affect safe operation.
Next, inspect fluid levels, the engine compartment, cooling components, batteries, and hydraulic hoses for wear or leakage. Examine the tracks, rollers, sprockets, attachments, tires if fitted, pins, guards, and structural components for cracks, excessive wear, or missing hardware. Clean away debris that could create a hazard. Record any defects and do not operate the loader until serious problems are corrected. Finally, start the machine from the designated position and carefully confirm that all controls, brakes, steering, and safety systems respond properly before beginning work.

BestDeal Forklifts